Showing posts with label recipe. Show all posts

Monday, January 26, 2015

chicken and white bean chipotle chili


Ben and I have a habit of picking up dinner at Chipotle when we're feeling lazy, but it probably takes just as much time to throw together a healthy homemade meal as it does to get in the car, drive, order, come home, etc. Weeknight recipes like this require little more effort than opening cans and dumping ingredients together, but the end result tastes amazing, almost restaurant quality :)

I love making a big pot of chili or soup to last through the week. This chili is different than any other kind I've ever tried. It's kind of a cross between white chili and traditional chili, and it has an addicting smoky flavor that's balanced by the creaminess of the Greek yogurt. It's like the sassy and spicy cousin to my regular chicken and white bean chili. Healthy comfort food at its finest!

Chicken and White Bean Chipotle Chili
Inspired by Better Homes and Gardens
serves 4-6

Ingredients

  • 2 large chicken breasts, diced
  • 1 red onion, chopped
  • 28 oz can crushed tomatoes
  • 14 oz can diced tomatoes
  • 2 T chipotles in adobo sauce* 
  • 2 cups (or 1 can) cooked white beans
  • 2 cups (1 can) broth
  • 1 T chili powder
  • salt and pepper
  • plain Greek yogurt
  • cilantro
*I freeze the leftovers flattened in a plastic bag and then break off bits to use in future recipes! I do the same with tomato paste--a tip I learned from Iowa Girl Eats.

Directions

Season the chicken with salt and pepper and cook in a large pot coated in cooking spray until browned. Add the onion, saute for 1-2 minutes, then add crushed tomatoes, diced tomatoes, chipotles, beans, broth and chili powder. Simmer for 10-30 minutes, top with Greek yogurt and cilantro, and enjoy! 

[21 Day Fix: 1 green, 1 red, 1/2 yellow]


Friday, January 16, 2015

the best lentil soup ever


For Thanksgiving at my sister in law's this past year I brought a lentil salad recipe I found in Better Homes and Gardens (or as Ben calls it, Better Homes and Gardens Than Yours) that had a dressing made with red wine vinegar and Dijon mustard and it freaking rocked. Like, it was ALMOST as good as the cornbread stuffing that our friend Meredith brought, and stuffing + cornbread are two of my most favorite foods.

A lot of people tell me I'm an amazing cook (and I will accept all compliments and accolades gladly, hehe), but really my secret is just paying attention to what I eat! If I eat something that makes me think OMG this is the most delicious thing ever, I make a mental note and try to remember the components of what made it so yummy to me.

When I'm making dinner I rarely follow a recipe exactly. I usually take inspiration from my hoard of cookbooks and magazines or the memory of a delicious meal I had at a restaurant and put my own spin on it. Once you start to learn what flavors go well together and some basic cooking skills, you'll become a chef too. (I started with Easy Mac, pasta with frozen garlic bread, Lean Pockets, and Hamburger Helper in college, so if I can learn how to cook you can too. I believe in you!)

Anyway, last week we were down to a few bare scraps in the fridge and I threw together this lentil soup that was inspired by our Thanksgiving side dish. It turned out to be the best lentil soup I've ever had! Healthy, hearty, savory, delicious, and you probably already have most of the ingredients in your pantry. Try it this weekend!

The Best Lentil Soup Ever
serves 4

Ingredients

-1T olive oil
-1 onion, chopped
-4 carrots, chopped
-4 cloves garlic, minced
-1 cup green lentils, rinsed
-salt and pepper to taste
-1 tsp dried thyme
-4 cups broth
-1 cup water
-1 can white beans, drained and rinsed
-2T Dijon mustard
-2T red wine vinegar
-green onions

Directions

In a large pot over medium heat, sauté the onion, carrots, and garlic in olive oil until partially cooked, about 3-4 minutes. Add lentils, herbs and spices, broth, and water and bring to a simmer. Cook for 40 minutes or until lentils are soft (the best way to test doneness is try a bite!). Stir in the beans, mustard, and vinegar and simmer for another 5 minutes. Top with chopped green onions and enjoy!

Toast and peanut butter makes the perfect side to lentil soup.

(21 Day Fix: 1 yellow, 1 green, 1 tsp per serving. Makes 4 servings.)

Friday, January 9, 2015

zoodles with beef and veggie bolognese sauce


Chiberia has officially returned! The highs this week have been in the single digits at best, and Ben had two days off school this week for cold. I've spent my days huddled under 4 layers of clothes in front of the space heater, downing enormous mugs of homemade herbal tea lattes.

I've been craving warm, cozy comfort food and wine every night, but I'm not going to make the same mistakes I did last year! Last year I let the Polar Vortex get the better of me. This year I'm determined to use this time of fewer distractions to really focus on my personal goals, including my health and fitness!

After fully indulging through the holidays, I'm limiting my wine to Wednesdays and weekends (balance!) and doing my best to stay on top of my clean eating. Luckily it's pretty easy to re-make my favorite comfort foods into healthy options! Here's one way to satisfy your carb cravings without blowing your goals. I'm a hardcore pasta lover but even I can feel satisfied by replacing carb-heavy noodles with zucchini! The texture is almost identical, try it out!

Zoodles with Beef and Veggie Bolognese Sauce
Serves 4
Inspired by Cooking Light

Ingredients

-2 large zucchinis
-1 yellow onion, chopped
-4 cloves of garlic, chopped
-4 carrots, peeled and chopped
-1 lb lean ground beef
-1 can of diced tomatoes, drained
-1/2 jar of no sugar added marinara sauce (I love Aldi's organic sauce!)

Optional: extra veggies! Clean out your fridge! Mushrooms, chopped bell pepper, spinach, any veggie would be good to throw into this sauce.

Directions

-Using a spiralizer, mandolin slicer, or veggie peeler, transform your zucchini into noodles!
-Transfer zoodles to a large glass bowl and microwave for 4-5 minutes, until softened.
-Add 1 T olive oil to a large pan over medium heat and sauté the onions, garlic, carrots and extra veggies until soft.
-Add the beef and continue to cook until browned.
-Drain your diced tomatoes and add them to the pan with the marinara sauce.
-Heat through, and serve over zoodles!

[21 Day Fix: 2 greens, 1 red]

Husband modification: I made regular whole wheat pasta for Ben. 

I hope you are staying warm this week!

Friday, December 12, 2014

homemade microwave popcorn


Happy Friday!

I feel like I've been using this blog as dumping grounds to process all the deep stuff I'm going through right now. GROWING PAINS! It's all good, but all overwhelming. So how about a lighter post for the weekend?

This has been my afternoon snack all week! I'm obsessed. 

Who doesn't love the convenience and delicious buttery warm crunch of fresh popcorn? I've been avoiding microwave popcorn for a while because even the "healthy" kind tends to have nasty chemicals in the bag, plus it’s expensive. My younger sisters make traditional stove top popcorn in  a heavy skillet over an open flame, but that always seems a little too ambitious for me. THEN I discovered this DIY method for microwave air-popped popcorn. Life changer! It's super easy, fun, cheap, delicious, and the popcorn doesn’t burn even when you pop it until almost all the kernels have exploded.

Homemade Microwave Popcorn
Serves 1

Ingredients

+3T popcorn kernels
+coconut oil spray
+stevia
+salt

Directions

+Put popcorn in a large glass bowl, cover with an upside down plate, and microwave for 4-5 minutes, until kernels are popped! (I use a clear Pyrex bowl so I can watch them)
+CAREFUL, bowl will be super hot! Remove with oven mitts and transfer popcorn into a serving bowl.
+Spray with coconut oil, sprinkle with stevia and salt! Or salt and pepper. Or hot sauce. Or parmesan. Or let marshmallows melt into the hot popcorn. The options are endless :)

(1 yellow on the 21 Day Fix or Insanity:Max nutrition plan)

Have a fantastic weekend!

xo Anna

Sunday, November 23, 2014

sweet potato shepherdess pie


It officially feels like winter in Chicago. The leaves are gone, desolation and darkness is setting in, I've started to string twinkle lights around the windows, and the puffy coat is OUT! We just made it through a solid stretch of record breaking below-freezing days and now the weather has "warmed up" for a very brief respite (funny how 40's can feel so deliciously balmy after sub zero windchills) but it's pouring rain.

Also known as: perfect comfort food weather!

We've had a busy weekend--yesterday we tackled errands and cleaning, then went to the movies to see Interstellar. Talk about INTENSE! Have you seen it? It was fascinating and I definitely recommend it, but I don't think I'd ever want to see it again simply because it was one of those "high emotional investment" movies for me! You know the kind? Where you walk out of the dark room completely depleted and disoriented? Let's just say that I'm extremely grateful to be living in a pre-apocalyptic world, ha.

Today I took a mini-road trip to Indiana for the baptism of my cousin's sweet baby girl. It was great to spend time with my family and catch up. Family is one of the top priorities that I'm focusing on (necessary to avoid letting the crazy chaos of self-employed life get the best of me!) so it was worth the drive, although I'm pretty exhausted now. Luckily I made this huge casserole for dinner yesterday so we could re-heat some leftovers for a lazy Sunday night dinner.

I was inspired to make this riff on shepherd's pie by a recipe from one of my all time favorite cookbooks, Veganomican. So I totally ruined the vegan aspect by replacing the tempeh with ground turkey...but it turned out delicious! I absolutely love making mashed sweet potatoes, and I like calling this Shepherdess Pie because of the extra sweetness.

Sweet Potato Shepherdess Pie
Inspired by Veganomican
Serves 6

Sweet Potato Layer

-3 sweet potatoes, peeled and diced
-1/4 c milk
-1 tsp dried rosemary
-salt and pepper

Turkey Layer

-1 T olive oil
-1 yellow onion, chopped
-4 cloves garlic, chopped
-8 oz sliced mushrooms
-1 lb ground turkey
-1 1/2 cups frozen peas
-1 1/2 cups frozen corn
-2 T tamari or soy sauce
-2 cups low sodium broth
-2 T corn starch

Preheat the oven to 375*.

Place the chopped sweet potatoes in a large pot, cover with cold water, then bring to a boil and cook for 10-15 minutes, or until they can be pierced with a fork.

While potatoes are boiling, heat the olive oil in a large skillet. Add the onion, garlic, and mushrooms, and sauté until veggies are soft. Add the ground turkey and continue to sauté until the meat is cooked.  Add the frozen peas, corn, soy sauce, and cook until the peas and corn are heated. In a separate Pyrex or bowl, whisk together the broth and corn starch, then pour into the skillet and bring to a simmer. Cook for 3-4 minutes, until the liquid has started to thicken.

When potatoes are soft, drain them and then add the milk, rosemary, and salt and pepper to the pot. Mash away!

Transfer the turkey mixture to a 9x13" baking dish, then top with the sweet potatoes. Bake at 375 for 25-30 minutes. Serve with a big side salad!

[21 Day Fix: 1 yellow, 1 red, 1/2 green per serving]

Enjoy!

xo Anna

P.S. Stay tuned later this week for new scarves coming to the shop and a HUGE Black Friday sale! Make sure you're signed up for my newsletter to get advanced notice ;)

Tuesday, November 4, 2014

chocolate ganache olive oil cake


Yesterday we celebrated Ben's 29th birthday! We first started officially "hanging out" (college speak for dating) around the weekend of his 21st birthday, which seems crazy to me. We've come so far in the past eight years!


Birthday boy in his birthday scarf...awww ;)
It's become tradition for me to make some form of baked pork and apples with a chocolate cake for Ben's birthday dinner. Sometimes I try to "healthify" the cake, sometimes we go for the store bought ice cream cake, and sometimes I just have to go all in.


Enter this magical vintage cookbook I inherited from Ben's grandmother Mimi. Favorite Recipes of Home Economics Teachers from 1963? GOLDMINE!

I chose a simple looking chocolate cake recipe from among the 57 options (no exaggeration, just counted them all) and tweaked it to bring it up to 2014 standards. 


A little "rustic," but this chocolate cake turned out SO moist and delicious! And of course the ganache is always a bonus. I replaced the shortening called for in the recipe with olive oil, hooray healthy fats! If you're intimidated by the idea of making a cake from scratch, you need to give this recipe a shot. It is just as easy as a boxed mix and SO much better for you (...at least less unhealthy?) without the extra preservatives.


Chocolate Ganache Olive Oil Cake

adapted from Favorite Recipes of Home Economics Teachers, Desserts Edition

Cake 

1 1/4 c sifted unbleached all-purpose flour
1 1/2 tsp baking powder
1/2 tsp baking soda
1/2 tsp salt
1/2 c cocoa powder

1/2 c olive oil
1 1/4 c sugar
1 c milk
1 tsp vanilla
3 eggs

Preheat oven to 350*F.

Sift together dry ingredients in a bowl. In a stand mixer or separate bowl, beat together olive oil, milk, sugar, vanilla, and eggs. Add dry ingredients and whisk until batter is smooth, 1-2 minutes.

Grease two round 8" cake pans and divide batter evenly between them.

Bake for 30 minutes, or until the edges start to separate from the pans and a toothpick comes out clean! 

Allow cakes to cool in the pans before assembling and frosting.

Ganache

8 oz semi-sweet chocolate, chopped (I used 2 blocks of Baker's)
3/4 c heavy whipping cream

Bring the cream to a simmer in a small sauce pan. Turn off the heat, add the chocolate, and stir until chocolate is melted. Allow ganache to cool for 15-20 minutes, whisking every once in a while, until it is thick enough to be used as frosting.

Once cake is cool, place one layer upside down on a plate. Spread about 1/3 of the ganache over the first layer. Add the second layer right side up (so the flat bottoms are together...yeah I didn't do it this way haha) and spread the rest of the ganache over the top!


Thursday, October 30, 2014

chocolate cookie dough oatmeal


Continuing on my "dessert for breakfast" theme...

This morning I decided to try making cookie dough bites from vanilla Shakeology. So delicious! 

Shakeology is a superfood/protein shake that I usually drink every day as a smoothie, but now that it's getting colder I am getting a little more creative with how I make it! It's fun to play with.


Chocolate Cookie Dough Oatmeal
Serves 1

Oatmeal
-1/2 cup old fashioned oats
-cinnamon
-1/2 tsp vanilla
-1/2 tsp almond extract
-1/4 c unsweetened almond milk
-1 T cocoa powder

Cookie Dough
-1 tsp coconut oil, melted
-1 scoop or packet Vanilla Shakeology
-dash of cinnamon
-2-3 tsp unsweetened almond milk

Make your cookie dough bites by melting the coconut oil in a bowl (I microwaved for 30 secs), add the Shakeology, cinnamon, and 1 tsp of almond milk at a time until a thick, dry, dough forms. Chill in the fridge while you make your oatmeal!

Cook the oats on the stove in 1 cup of water with a dash of salt. When the oats are almost finished, stir in the cinnamon, extracts, almond milk, and cocoa powder.

Roll your Shakeology dough into small bites and top your oats!

[21 Day Fix: 2 yellow, 1 red]

Wednesday, October 29, 2014

double chocolate brownie oatmeal


Do you ever have one of those days where you wish you could just eat chocolate for breakfast? Or even better...a whole pan of brownies? Yeah me too. So I made a healthy superfood packed version!

Double Chocolate BROWNIE OATS!

Serves 1

Ingredients || Oatmeal

-1/3 cup oats
-1/2 tsp vanilla
-1/2 tsp cinnamon
-dash salt
-1/4 c unsweetened almond milk
-1T cocoa powder

Ingredients || Brownie Bites

-1 tsp melted coconut oil
-1 scoop chocolate Shakeology
-2 tsp almond milk (add one at a time)

In a small bowl, melt the coconut oil, add Shakeo, and then add almond milk 1 tsp at a time, until the texture is thick and brownie-like. Chill the brownie batter in the fridge while you cook your oatmeal!

Cook the oats in 2/3 cup water with vanilla, cinnamon, and salt. When oats have absorbed all the water, add the almond milk and cocoa powder and stir to combine.

Roll your brownie batter into bites, top your oatmeal, have the best day ever.

[21 Day Fix: 1 yellow, 1 red, 1 tsp]

Saturday, October 25, 2014

Butternut and Autumn Stuffing Bake || 21 Day Fix Approved Recipe


Healthy comfort food is the name of the game as the leaves start changing colors and the temperature starts dropping. Fall is my favorite "food season" because what's not to love about cozy soups and chili, rich spices, savory herbs, baked veggies and squash, and anything related to Thanksgiving?

Now that my schedule is finally calming down and I'm able to spend the weekends relaxing at home instead of driving around the Midwest for my grand wedding tour, I'm looking forward to trying more time intensive and adventurous recipes on Saturday nights. This particular casserole was inspired by a twice-baked stuffed butternut squash recipe from The Paleo Kitchen. I was using a small butternut squash from my grandma's vegetable garden, so I decided to combine everything into one dish.

This Butternut and Autumn Stuffing Bake is definitely going to be a regular on my dinner rotation. It's slightly sweet, savory, filling, deceptively healthy, and perfectly captures everything I love about the season!

Butternut and Autumn Stuffing Bake
Serves 4

Ingredients

1 small butternut squash
1 lb lean ground turkey
1 apple, chopped
1 yellow onion, chopped
4 cloves of garlic, minced
1 tsp dried rosemary
1 tsp curry powder
2 eggs
shredded cheddar (optional)
salt and pepper to taste
coconut oil spray

Slice your butternut in half lengthwise, scoop out the seeds (reserve to roast!), place the squash halves cut-side down on a baking sheet, and bake for 30-40 minutes at 400*, or until the squash is soft when you pierce it with a fork.

In the meantime, take the biggest skillet you have, coat it with coconut oil spray (my most recent obsession...it's supposed to be better for you than canola oil), and sauté the apple, onion, and garlic for 3-5 minutes. Add the ground turkey, rosemary, curry, salt and pepper, and sauté until the turkey is cooked through.

Once the squash is baked, take it out of the oven and let it cool for a few minutes, then scoop the squash out of its peel and mix it into the pan of turkey.

In a small bowl, whisk the two eggs together and then stir them into the squash and turkey mixture so everything is combined.

Reduce the oven temperature to 350*, transfer your casserole mixture into an 8x8" glass baking dish coated in coconut oil spray, top with cheese (optional), and bake for 25 minutes.


Sprinkle with roasted seeds, serve with a green salad and enjoy! I drizzled some Cholula hot sauce on mine :)

[Serves 4, each serving: 1 green, 1 red, 1/4 purple on the 21 Day Fix (add 1/2 blue for cheese)]

xo Anna

Thursday, October 23, 2014

french toast oatmeal || two ways


Oatmeal is hands down one of my favorite breakfasts. I could eat it every single day and be a happy camper, and if you think you aren't a fan, you just haven't tried Anna-style oats. However, oatmeal on its own is never enough to keep me full for longer than an hour or two so I'm always looking for ways to soup it up and add some extra volume and protein.

Recently I've been adding eggs right into the pot. I know, I know, it sounds weird and kind of disgusting, but hang with me! I started with whisking in two egg whites while the oats were cooking, but now I am adding whole eggs, yolk and all. I swear it makes the oatmeal taste like French toast! And the extra protein and healthy fat will keep you full much longer. It's really important to eat protein at breakfast so your blood sugar doesn't crash from the typical carb-heavy breakfasts we're so fond of.

This recipe is very customizable and you can spin it in any flavor combination that strikes your fancy! Pumpkin French Toast is next on my list...

Here's the basic recipe:

French Toast Oatmeal

serves 1

1/3 cup old fashioned oats
2/3 cup water
1 tsp cinnamon
1 tsp vanilla
1/2 tsp almond extract (optional)
2 eggs

Bring the water to boil in a small pot. Add the oats, cinnamon, and any additional spices. Cook the oats for 2-3 minutes, until about 80% of the water is absorbed. Stir in the vanilla, and then whisk in the eggs, breaking the yolks. Continuously stir the oat/egg mixture until eggs have solidified and are incorporated into the oatmeal, and all liquid has been absorbed.

Top with maple syrup and fruit!


Strawberry French Toast Oatmeal
Top with fresh or microwaved frozen strawberries and maple syrup!


Banana Cinnamon French Toast Oatmeal
Top with 1/2 sliced banana and extra cinnamon and nutmeg.

[These recipes count as 1 yellow, 1 red, and 1 purple on the 21 Day Fix!]

Are you an oatmeal person? Let me know if you try these recipes, I'd love to hear what you think!

xo Anna

Tuesday, October 7, 2014

Chicken and White Bean Chili


One of my favorite fall and winter comfort foods is CHILI! There are so many fun and delicious variations you can concoct, and it's such a filling and healthy complete meal in a bowl. Make a big batch every week and you're set for lunch and weeknight dinners. Happiness is having a big batch of leftover chili marinating in the fridge.

This week's version is a little bit non-traditional but crazy delicious! It cooks up in one pot (hello easy clean up), or you can dump everything in the crockpot and let it cook on low all day.

Chicken and White Bean Chili
Makes approx 6 servings

Ingredients

-1 T olive oil
-1 package chicken breasts
-1 yellow onion, chopped
-2 bell peppers, chopped
-4 garlic cloves, minced
-1 14 oz can diced tomatoes with green chiles (Rotel)
-1 28 oz can diced tomatoes
-2 cans white beans
-4 c low sodium chicken or veggie broth
-1 tsp curry powder
-1/2 tsp onion powder
-1/2 tsp garlic powder
-1 tsp Mrs Dash Chipotle seasoning (or a few sprinkles of red pepper flakes)
-salt and pepper to taste
-1 heaping T corn starch

In a large Dutch oven or pot, heat the olive oil and cook the chicken until almost done, seasoning with salt, pepper, and Mrs. Dash. Add the onion, bell peppers, garlic cloves, and sautee 3-4 minutes, until veggies start to soften. Add the diced tomatoes, beans, broth, and seasonings and simmer until heated through (the longer the better!). Dissolve corn starch in 1/4 c cold water, then slowly whisk into the chili. Stir and simmer until the chili thickens slightly.

Serve with cilantro, lime, and your favorite toppings! Bacon, cheese, and a dollop of plain Greek yogurt or sour cream would also be delicious.

[21 Day Fix: 1 cup serving = 1 yellow, 1/2 red, 1 green]

Wednesday, October 1, 2014

Sirloin Roast with Brussels and Sweet Potatoes


Oh hi October! Where did you come from?

Cooler weather means it's time to turn on the oven and roast ALL THE THINGS! I've been all about the simple, fast, fool proof, healthy weeknight dinners lately. Tonight I whipped up a beef sirloin roast with balsamic-honey glazed Brussels sprouts and caramelized sweet potatoes!

I found this pre-seasoned sirloin roast at Aldi's, you can also do a pork loin roast. I just put it in a small pan and roasted according to the package directions (450* for 30-40 mins).

On the side, I sliced up two sweet potatoes, coated them in olive oil, salt, pepper, garlic salt, and roasted along with the beef. I also dumped a bag of Brussels sprouts into a third pan and coated them with a drizzle of olive oil, salt and pepper, garlic salt, balsamic vinaigrette, and a little bit of honey.

Flip the sweet potatoes after 15 minutes, and remove them when they're getting browned. Mine took about 20-25 minutes total. The brussels sprouts and beef took the full 35 minutes.

Let the beef rest for 5 minutes before slicing. Then plate up and enjoy!

(Come visit my Facebook page for more of my simple healthy recipes!)

21 Day Fix: 1 yellow, 1 green, 1 red

Wednesday, September 24, 2014

ginger sage butternut squash soup with sausage


Happy Autumn! I am so happy that soup and comfort food season has arrived!

There's a quick backstory to this recipe. Bear with me.

Is there anything out there that for some reason you really really really think you "should" start doing, but no matter how hard you try it's a huge struggle?

For example, I remember for YEARS I wanted to get into the routine of weekly meal planning so I could make one grocery list and stick to it. Have you ever struggled with this? It always seemed impossible and I'd end up going grocery shopping multiple times a week and purchasing way too many impulse buys. Well, one day I realized that I'd started meal planning without even realizing it! I don't remember when it started, but now every weekend I go through my latest Cooking Light magazine, cookbooks, and Pinterest boards and pick a few new recipes that I want to try. It's just a habit and I barely think twice about it! I'm not sure if it actually saves us money since I am a compulsive new recipe hoarder and we both eat so much food...but it at least makes the weekdays flow a little smoother because we always know what's for dinner.

Anyway.

The point of this story is that for the past several months I've had this nagging urge to start blogging more of my own recipes. I'm obsessed with collecting recipes from blogs, Pinterest, cookbooks, and magazines, but half the time I end up putting my own spin on it anyway. Ben is the opposite--cooking is like chem lab for him and he has to diligently measure out every 1/2 tsp of oil, but I like to get inspiration from a recipe and then go with my intuition and freestyle the rest of the way.

I take photos of all my dinners to post on Instagram, so I know that it won't take much extra time to jot down the recipe and throw it up here. I'm making it happen! And I'm also sharing recipes on my Facebook page. So excited! Start turning those "should do's" into action!

My preferred style of dinner is a fast, simple, and healthy one-pot meal. I love soup and I'm so happy the weather is finally cooling off so it feels like soup season! I also love butternut squash so this had to be my first official soup of the fall. Squash is usually a huge death-defying pain to peel and chop so I skipped those parts all together and roasted it in the peel. Just make sure you plan ahead enough to get the squash in the oven about 45-60 mins before you want to eat. If you're running short on time you can chop it in advance and cook it in the microwave.

Ginger Sage Butternut Squash Soup with Sausage
Serves 3-4

-1 butternut squash
-1 T coconut oil
-1 red onion, chopped
-4 cloves garlic, minced
-2 tsp fresh ginger, minced
-4 c veggie or chicken broth
-1 tsp fresh rosemary
-1 T fresh sage
-salt and pepper to taste
-2 links Italian turkey sausage

Preheat oven to 350*. 

Slice squash in half lengthwise, scoop out the seeds, and set the seeds aside to roast!

Place squash cut-side down in a baking pan filled with 1/2" water, and bake for 30-35 minutes, or until the squash is soft enough to be easily pierced with a fork. Allow squash to cool for a little bit and then scoop it out of the peel with a spoon.

(To roast the seeds: squish them out of the squash goop with your fingers, combine with 1T olive oil and 1/2 tsp salt, and bake at 350* for 10-12 minutes stirring and watching constantly because they burn fast!)

While the squash is baking, heat coconut oil in a large pot or Dutch oven and cook the onion until transclucent. Add the garlic and ginger and cook an additional 1-2 minutes. Pour in the broth, add the squash and herbs, and cook for about 5 minutes. Puree with an immersion blender (or CAREFULLY transfer into a food processor). Taste the soup to see if it needs any salt or pepper. 

While soup is simmering, slice the turkey sausage into coins and cook in a skillet.

Serve the soup topped with sausage, sage, and seeds!

Wednesday, September 10, 2014

Raspberry Oat Protein Pancakes


Have you ever tried a protein pancake?

It's kind of a health and fitness cult thing, a pancake made with protein powder instead of flour. It sounds weird at first, but you mix the protein with some smashed bananas and egg, and it actually works! I was introduced to the recipe when I joined the Tone It Up community last summer.


Breakfast is hands-down my favorite meal of the day, and I'm always trying to find something that fills me up for at least half the morning. Protein pancakes have become a staple in my rotation, and I usually make one (or a waffle version!) at least once a week. Brown rice protein powder seems to work the best since it has more of a flour consistency than other proteins, and my favorite brands are Perfect Fit and Sun Warrior. They're both kind of pricey, but a bag usually lasts me a few months since I don't eat protein pancakes everyday. I also prefer the consistency, flavor, and ingredients of Shakeology for smoothies, so I save my brown rice protein for these pancakes!

I'd say that protein pancakes do an 80% job of satisfying my pancake cravings (they're definitely not as good as the real thing), but they keep me full and energized for so long without the carb coma and sugar crash of the real deal!

The basic protein pancake recipe calls for 1/2 banana, egg whites, 1 scoop of protein powder, cinnamon, and a small splash of almond milk. I think that recipe turns out a little dry, but they're good if you top them with fruit and Greek yogurt.

I like to add a little bit of oat flour to the mix to give the pancakes a more satisfying, cake-y texture. This is my current go-to recipe that I've been eating a lot lately!

Raspberry Oat Protein Pancakes
Serves 1

Ingredients:
-1/2 ripe banana
-1 egg
-1/4 cup almond milk
-1 scoop brown rice protein
-1/4 cup oat flour (literally just oats pulverized in a food processor)
-1 tsp cinnamon
-1/4 tsp baking soda
(optional: vanilla or other flavored extracts)

Topping:
-2/3 c fresh or frozen raspberries, warmed in the microwave
-1/4 c plain Greek yogurt sweetened with stevia

Mash the banana and egg together in a bowl with a fork until the banana is almost smooth. Add remaining ingredients and combine thoroughly. Preheat a pan while you're mixing your batter (I've discovered that cast iron works the best!) and coat it with coconut oil or non-stick spray. Once the pan is nice and hot, turn the heat down to medium-low, pour in your batter, and let it cook for 5-6 minutes until the edges are starting to solidify. Use the biggest spatula you have to flip the pancake and cook it on the other side for 2-3 minutes.

You can make one giant pancake or two to three smaller ones. Smaller pancakes are easier to flip and good to start with until you get the hang of the technique! It's important to make sure your pan is really hot, and then cook your pancake long enough so it's more than halfway done before attempting the flip. It's easy to end up with a "pancake scramble" if you don't let it cook long enough, but luckily a scramble is just as tasty.

[21 Day Fix: 2 purples, 1 1/2 reds, 1/2 yellow]


Top your pancake with the Greek yogurt and berries, and enjoy!


Friday, August 15, 2014

black bean and summer veggie burrito bowl


Happy Friday!

This week has thrown me way off schedule, but in a good way. Wednesday night Ben and I went to a Cubs game, and then yesterday I took the day off for a semi-impromptu girls day with my sister Ella! We had a jam-packed adventure in the city (which is turning into a habit...) including eating at three of my favorite restaurants, shopping, and walking 204398 miles.

This weekend Ben and I have absolutely no plans for the first time in as long as I can remember and I'm really looking forward to having a chance to organize my life/mind/apartment and just BREATHE! I'm coming up on my last two weeks at work, and I want to be able to enjoy and make the most of this once in a lifetime transitional phase instead of stressing out and feeling overwhelmed.

Anyway, that's what's up with me right now! Since life has been so crazy, dinners have been one of two things: going out, or super easy and fast concoctions at home. It's all about balance!

August is the best time of the year in terms of vegetables. Everything is in season, and it's hard not to go overboard at the farmer's market! The central Illinois small town girl inside of me has a pretty high standard for sweet corn, and I'm happy to say I found a great corn hook up here in the city. This black bean and summer veggie burrito bowl has it all, and is a great way to use up random veggies in the fridge!

Black Bean and Summer Veggie Burrito Bowl
Serves 4-6

Ingredients

-1 T olive oil
-one red onion, sliced
-2 ears of corn, cooked or raw
-2 cans of black beans, drained and rinsed
-red cabbage, shredded
-tomatoes, chopped
-spinach
-(Insert random veggies here. More is more!)
-taco seasonings (I love Mrs. Dash chipotle seasoning)
-cilantro
-1 lime, juiced
-plain Greek yogurt (a large dollop per serving)
-guacamole

Heat the olive oil in the largest pan you have. Saute the onion for 4-5 minutes, then add beans, corn, cabbage, tomatoes, spinach, and random veggies, spices, and cook until it's all warmed up. Top with cilantro, lime juice, yogurt, guacamole, and enjoy!

This bowl would also be great with some rice, or wrapped up in a tortilla as an actual burrito. And voila, you don't even need to go to Chipotle! AND you can use the money you save to grab some ice cream or froyo for dessert. That's what I would do.

Monday, August 4, 2014

salmon with warm bacon and mustard sweet potato salad


Every once in a while I find or concoct a recipe that is just so delicious I want to save it to remember for later! Since I'm such a recipe hoarder, I rarely make the same thing more than once (excepting basic proteins like chicken, steak, and salmon) therefore I'm going to start posting the recipes that were a hit so I can remember to make them again! And so you can enjoy them too. All my dinner recipes are healthy, simple, and fast, perfect for busy weeknights (and then you'll have room for ice cream if it's one of those nights!)

Tonight we made a basic broiled salmon and I paired it with a warm potato salad inspired by a recipe from a Martha Stewart cookbook. I tweaked the ingredients a little bit and it turned out absolutely delicious! I love sweet potatoes and need to make them more often. They are delicious with salty bacon. Yes I'm on a bacon kick.

Salmon with Warm Bacon and Mustard Sweet Potato Salad
Serves 4

Salmon:
-4 wild caught Pacific salmon filets (we usually broil them straight from frozen)
-1/2 lemon
-spices to taste

Potato salad:
-3 medium sweet potatoes
-2 celery stalks, chopped
-1 or 2 slices of cooked bacon, chopped
-1/4 c. red wine vinegar
-2 tsp. Dijon mustard
-1 to 2T whole grain brown mustard
-1T olive oil

Chop potatoes into 1" chunks, place in a large pot, fill with water and bring to a boil. Cook potatoes for 10-12 minutes, until soft when pierced with a fork.

While potatoes are boiling, squeeze lemon juice over the salmon, liberally sprinkle with spices (we like Mrs. Dash lemon pepper and Old Bay), and broil until cooked through.

Combine vinegar, mustards, and olive oil in a small bowl. When potatoes are done, drain them and dump the dressing into the pot, stir to combine. Add the celery and bacon.

Serve the salmon over greens with a side of potato salad, and enjoy!!


Wednesday, February 13, 2013

afternoon tea : how to make a London Fog

(why yes, I'm using the creamer for decorative purposes only)
 
In the winter, I drink endless mugs of tea throughout the day in an attempt to stay warm. Usually it's herbal so I don't over-caffeinate myself, but Earl Grey is hands down my favorite tea variety. It's probably the only tea that can even compete with coffee in my book, and it tastes delicious with milk.
 
A few years ago my Anglophile English-major sister introduced me to the wonderful tea beverage called the London Fog and I've been making it for myself a lot lately. You can order it at coffee shops but to save sugar calories and $$ it's easy to re-create at home!
 
Just brew a strong cup of Earl Grey, add a splash of vanilla extract (about 1/2 teaspoon), and top it off with lots of milk (steamed, if you have a frother thing). If you make Earl Grey this way it tastes like dessert and doesn't even need extra sweetner so it's good for you too! Enjoy with cookies or a scone.


Friday, February 8, 2013

friday adventures and name changing

 
Happy Friday!
 
 
I made a new chunky cowl! I super like it.
Also, I babysit for an extremely talented hair stylist who gave me a trim and blowout last night after she came home! Best gig ever.
 
So, this has been quite the eventful day for me.
Go past the following essay on name changing to get to the best hummus recipe ever.
 
Ben and I have been married for four months now and I've been procrastinating on the whole name-change thing. Lots of reasons, mainly laziness and a little because I'm kind of freaked out with the change concept.
 
When you're engaged, you're suddenly made aware of the drama behind the patriarchal last name tradition, and the choices seem endless. Hyphenate? Keep maiden name? Change? Change socially only? Make maiden name middle name? Merge last names into something completely new? Make husband take maiden name (is it weird that this is not culturally acceptable)? Also, changing your name on every single document, account, card, and address in your life is a big undertaking and let's face it-- a complete identity crisis.
 
My maiden name is Vandervlugt, because my dad was born and raised in the Netherlands. Obviously Dutch culture has been a huge part of my life, and being the only Anna Vandervlugt in North America (that Google is aware of, anyway) is pretty awesome. However, I do really like Ben's last name and think it's important for us to share it as a new family unit, plus he's the last male carrier in his immediate family. On top of that, I always knew Ben wanted me to take his last name and I have no problem with that.
 
In conclusion, I decided a while ago that I'd take Ben's last name but not delete my maiden name. In other words, I'd have two "legal" unhyphenated last names. That way, I could slowly transition into being Anna Locke socially but still be Anna Vandervlugt professionally if I wanted. Yes ladies, you CAN do this!
 
My drivers license expires on my birthday in two months, so this week I decided to take the plunge and undertake the process so I only have to make one trip to the DMV (smart, right??) The first thing you have to change is your name on your Social Security card and I read somewhere that 9 am on Friday is the best time to do that in terms of the line, so this morning I took an official copy of our marriage license, every ID I could find, the Social Security application from here, and hit the icy streets of Chicago in search of the nearest SSA office.
 
After waiting for only 15 minutes, my ticket number was called and I went to the counter with all my documents. At this point, you need to know that my middle name has been Maria my entire life...until the lady at the counter told me I've been on file with the government as Anna Marie since 1988. Whaaaa????! Cue huge confusion. So now my name is Anna Marie alias Maria Vandervlugt Locke.
I called my mom and she verified that my birth certificate does say Maria and some Social Security person in 1988 made a mistake that will take another trip to the office with birth certificate to correct. Sigh. I might just let it go since it hasn't been an issue for 25 years...
 
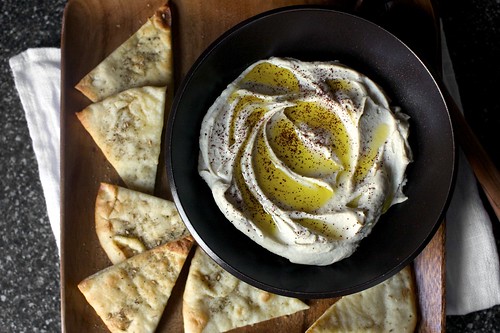
So that was a fun adventure. If you've read this far and if you're a hummus fan, I'll reward you now with a life changing discovery!
You know how Sabra hummus has that amazing smooth texture that is impossible to re-create if you've ever tried to make hummus at home? And also, you know how Sabra is always like $3 more expensive per tiny little tub than the other inferior hummus brands?
 
The DIY secret to that lucious creamy consistency is to PEEL THE CHICKPEAS.
 
(image from Smitten Kitchen)
 
It takes about 10 minutes to peel a can, but it's well worth the time to achieve amazingly smooth hummus for less than a dollar. I discovered this technique via Deb at Smitten Kitchen (click link to get the recipe) and it has rocked my world.
 
So make hummus and have a great weekend!
I'll keep you updated re: the journey to becoming Mrs. Locke.


Monday, February 4, 2013

food I made for Superbowl

So how about that Superbowl?
I normally can't stand football for many reasons but that was probably the most exciting game I've ever seen.
Epic touchdowns, inconceivable interceptions, Beyonce, Destiny's Child giving me strange 7th grade flashbacks, random power outage, tantruming brothers coaching on opposing sides, almost epic come-back, confetti snow angels, oh and of course THE BABY CLYDESDALE ! Let me just imbed the video so we can all cry some more over the foal sold off for corporate gain and nasty beer.


Yup, crying again. Aaaaaanyway...
 
I'm glad the Ravens held onto the win since Ben lived in Baltimore while he was doing Teach for America. (Click here to read about my visits, from way back when this blog was new!)
 
But more importantly, let's talk about FOOD!
 
 
I made two delicious recipes to bring to our Superbowl party. I found them on other blogs so I'm just going to link back instead of copying the whole recipes. First are these chewy and decadent Peanut Butter Cup S'mores Bars from Alicia at Crowley Party. They taste as good as they sound.


And my new favorite recipe, Chewy Pretzel Bites stuffed with cheddar cheese and ham.
Oh. My. Word. They taste exactly like the irresistable warm salty-sweet soft pretzels at the mall food court. And they're actually really easy to pull off for a yeast bread!
Tips: I boiled the pretzel rolls BEFORE I sliced them up, and since our house is freezing I let the dough rise in the oven after heating it up at 200*F for a couple minutes then turning the heat off.
 
I am definitely making these pretzels again soon. I'm thinking a sugar-cinnamon version with cream cheese icing needs to happen.


Let me know if you try either of these recipes!
Did you watch the Superbowl? What did you think?


Friday, January 18, 2013

healthy banana bread muffins


HAPPY FRIDAY!!!! 
This week flew by, as I have been obsessively building my etsy shop. Adding new items gives me a high and I am excited about the Valentines cards and the new fluffy infinity scarves I'm adding!

Do you have any fun weekend plans? My best friend is coming to Chicago for a visit and for a medical residency interview. I can't believe she's almost a medical resident! That sounds so official. We used to want to be pediatricians together in grade school, and she is actually making those dreams come to life (I quit on them after discovering environmental science ha).
Also, it is supposed to be FREEZING here, like, lows in the single digits wahhh. I can't really complain though since we still haven't gotten any snow.

Anyway, here's a little muffin recipe for your Saturday breakfast!
At my bridal shower last summer all the guests were asked to bring a recipe to make a little cookbook for me. One of my bridesmaids (also named Anna) gave me this delicious banana bread recipe, or as she calls it "Benanna bread" for our celebrity name. I subbed vanilla Greek yogurt for the butter, which kind of altered the texture and made them more spongy but still delicious! If you go the healthy route the muffins are best toasted!


Healthy Banana Bread Muffins
aka Benanna Bread
Makes 1 loaf or 11-12 muffins.
Ingredients
-2 cups flour
-1/2 t. baking soda
-1 t. baking powder
-1/2 t. salt
-1/2 cup butter (I used 1/2 cup vanilla Greek yogurt instead for healthy version)
-1/2 cup brown sugar
-1 egg
-3 T. milk
-3-4 large bananas
-1 T. vanilla
-1 T. cinnamon
-1/4 cup nuts if your husband doesn't hate them

In a large mixing bowl, sift together flour, baking soda, baking powder, cinnamon, and salt. In a separate bowl, cream sugar and Greek yogurt (or butter). Beat the egg slightly and mix into wet ingredients. Peel the bananas, add to wet ingredients, and mash until creamy (I use a potato masher). Add vanilla and milk, then LIGHTLY combine wet and dry ingredients. Mix in nuts (optional).

Spread batter in a large loaf pan or a muffin tin coated with cooking spray.
Bread: Bake at 350* for 40-50 minutes
Muffins: Bake at 350* for 18-22 minutes, until tops are browned.

Enjoy warm!


Related Posts Plugin for WordPress, Blogger...