Wednesday, January 30, 2013

DIY watercolor wedding invitations


Our invitations

 It's been almost four months since our October wedding, and I think I'm finally ready to share more about it. During the actual planning process and all through the day itself, I was pretty overwhelmed with the intensity of the whole thing, but I've sufficiently recovered and I'm excited to show you some of the details I'm most proud of!

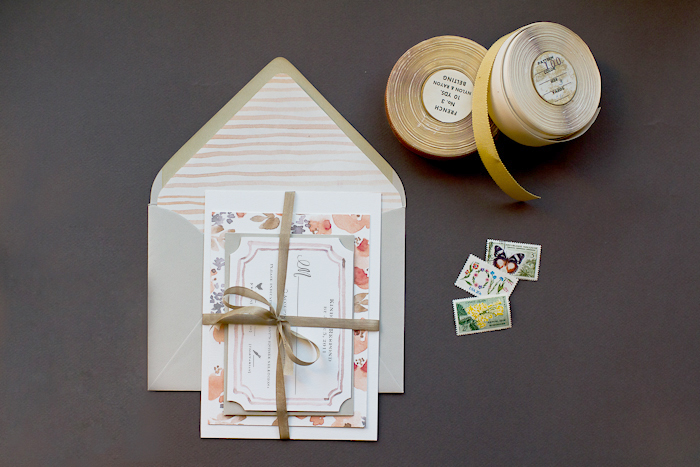
At the top of the list are my DIY watercolor invitations. I'm still shocked at how professional they ended up looking! I actually designed, printed, painted, and assembled them on my own at home, with watercolor paper and paint, a low-end HP printer, and an office sized paper cutter I borrowed from my grandma's farm. They were a huge hit and relatively easy to pull off, so here's how it all went down:

We were engaged for 18 months, which is a relatively long amount of time to plan a wedding. I figured that invitations were pretty low on my priority list and knew that I wanted to spend as little money as possible on them, since let's face it: most people maybe stick them on the fridge for a few months then it's into the trash. Since I'm a very crafty person and had lots of time on my hands last summer with the unemployment thing, I decided to make the invitations myself.

Like most brides, I had no idea what I was doing and had to learn everything about stationery and wedding etiquette on the fly. I started looking around the internet for some ideas and discovered the watercolor trend. Here's what I found and used as inspiration:


{a DIY watercolor tutorial from Oh So Beautiful Paper}

 {soft watercolor invitations by Monumental Designs via the Ruffled Blog}

{watercolor letterpress by the Aerialist Press via Invitation Crush}


The "how to print your own invitation guide" from A Practical Wedding was also very helpful. I proceeded with lots of trial and error.

Here's my final materials list:
-140 lb. watercolor paper for the invitation card (from JoAnn's with coupons)
-90 lb. watercolor paper for the insert cards (JoAnn's with coupons)
-3 5/8" x 5 1/8 " European-Flap RSVP envelopes in Quartz (cardsandpockets.com)
-A7 5.25 x 7.25 European-Flap envelopes in Quartz (cardsandpockets.com)
-OPTIONAL: 40# cream vellum paper for map insert (paperandmore.com)
-watercolor paint and brushes (already owned)
-heavy duty paper cutter (borrowed from family)
-basic HP printer and black ink cartridge
-calligraphy pen and ink for addressing envelopes (Michael's with coupon)
-hairspray to treat the addressed envelopes after I discovered the calligraphy ink would smear on the shimmery Quartz color 
-pretty stamps from USPS

Steps:
1. Download fancy fonts from dafont.com or Google Fonts.
2. Make and edit wording on MS Office for invitation, RSVP card, and details card.
3. Format the font sizes and text margins for these dimensions:
Invitation 5" x 7" (fits A7 envelopes)
RSVP and Details 3.5" x 5" (fits 4 bar envelopes)
4. Make PDF files with 2 invitations per regular 8.5" x 11" page, and 4 insert cards per page.
5. Using paper cutter, cut watercolor paper into 8.5" x 11" sheets.
**5. Test your printer on a watercolor sheet to see if it can handle the heavy paper. If not, you'll have to try printing at a professional printer like Staples or Kinko's. Luckily, the basic HP printer I was using could handle up to 140 lb watercolor paper, but some of the invites smeared and had to be discarded. Make sure you have plenty of paper and ink cartridges! I ended up using 1 ink cartridge for 55 invitations. 
6. Print!
7. Cut invitations (5" x 7") and insert cards (3.5" x 5") to size.
8. Paint! Be careful not to use too much water, since the paper will warp.
(9. Optional: draw a 5" x 7" location map, scan it at your local library if you don't have a scanner, and print onto vellum paper)
10. Address and stamp envelopes, assemble with invitation, map, RSVP card, RSVP envelope, details card, and mail! I only needed one stamp for each envelope mailed to a US destination (plus a stamp for the RSVP envelopes).

Final Cost: $101 for 55 invitations (not including postage and hours of time!)

I ended up with two versions, a floral one and a purple ombre one. It was fun to decide which invitations to send to which friend or family member!

In progress:


And a few of the best ones that I saved:


The script font I used is Sverige Script Demo from daFont.com. The lace is a scrap from the lace I used to make my veil.

If you're currently wedding planning and have more questions, shoot me an email at annikalikes@gmail.com!

And if you want your own watercolor stationery, I've started selling it in my shop :)

Monday, January 28, 2013

greek yogurt and pomegranate


Oh, pomegranates. The strange looking yet colorful fruit of winter. 

Confession: I've had a pomegranate in my fridge for at LEAST a month because I've been too lazy to cut it up. 

Luckily my sister in law assured me that it was still good, so I finally extracted the seeds and have been eating them on top of vanilla Greek yogurt lately as a mid morning healthy snack! The crunch and juicy burst of the seeds tastes delicious with the creamy yogurt. Yes, you do eat the whole seed. They're like the natural antioxidant filled form of Gushers (remember those from grade school?). 

Here's a link that shows you how to open and de-seed a pomegranate with minimal pink juice explosion!

You can also put the seeds in salad or oatmeal. Have fun!

Tuesday, January 22, 2013

joy is untouched by circumstance


For quite a while I've been subscribing to (somewhat cheesy but totally awesome) motivational emails from the Brave Girls Club, a website, community, and blog dedicated to empowering women to be good to each other and themselves. Usually I delete the emails but every once in a while I'll read the message of the day, which always seems to relate perfectly to what is going on in my life. Today's email on the difference between joy and happiness hit me because I've been spending a full year now trying to figure out my path in life and learning what it takes to live in the present, have trust and faith, and connect to my true self despite constant challenges and the deep void of scary blackness that threatens to overwhelm me whenever my confidence starts to drop. Recently I have been feeling the joy because I've discovered a creative outlet that gives me purpose through knitting and painting. I've been doing pretty good lately on focusing on what is RIGHT in life versus what is WRONG.

So anyway, here's a bit of deep philosophical inspiration for your Tuesday. I hope it speaks to you too, and I also hope that it is warmer where you are than it is here in Chicago today (high of EIGHT degrees, you'll find me buried in fluffy blankets in front of the space heater all day)!

Dear Joyful Girl,

Joy is good. Did you know there is a difference between happiness and joy? This anonymous quote describes it perfectly:

"Joy is untouched by circumstance."

You see, happiness is sometimes fleeting. Joy is a state of mind -- that no matter what happens, no matter how much we had planned on a different outcome, that we will always center our lives on what is RIGHT rather than what is WRONG. We will trust the moment and the unexpected gifts that every moment holds -- even the scary, strange, and unexpectedly difficult moments. Especially those moments actually.

Even Oprah said it perfectly:

"What I know for sure is that you feel real JOY in direct proportion to how connected you are to living your truth" -- Oprah Winfrey

Living your truth means listening very closely to the very quiet voice that is constantly trying to get your attention. Living your truth means being very very still and seeking truth and beauty and goodness and small miracles all the days of your life. Living your truth means being exactly who YOU are, in spite of who and what others around you are. Living your truth is a joyful path -- a path that no circumstances can every rip you off of.

Joy can be felt anywhere, at any time, it any situation. This is the truth.

Go forward in JOY, brave girl!

xoxo

(sign up for the emails here)


Friday, January 18, 2013

healthy banana bread muffins


HAPPY FRIDAY!!!! 
This week flew by, as I have been obsessively building my etsy shop. Adding new items gives me a high and I am excited about the Valentines cards and the new fluffy infinity scarves I'm adding!

Do you have any fun weekend plans? My best friend is coming to Chicago for a visit and for a medical residency interview. I can't believe she's almost a medical resident! That sounds so official. We used to want to be pediatricians together in grade school, and she is actually making those dreams come to life (I quit on them after discovering environmental science ha).
Also, it is supposed to be FREEZING here, like, lows in the single digits wahhh. I can't really complain though since we still haven't gotten any snow.

Anyway, here's a little muffin recipe for your Saturday breakfast!
At my bridal shower last summer all the guests were asked to bring a recipe to make a little cookbook for me. One of my bridesmaids (also named Anna) gave me this delicious banana bread recipe, or as she calls it "Benanna bread" for our celebrity name. I subbed vanilla Greek yogurt for the butter, which kind of altered the texture and made them more spongy but still delicious! If you go the healthy route the muffins are best toasted!


Healthy Banana Bread Muffins
aka Benanna Bread
Makes 1 loaf or 11-12 muffins.
Ingredients
-2 cups flour
-1/2 t. baking soda
-1 t. baking powder
-1/2 t. salt
-1/2 cup butter (I used 1/2 cup vanilla Greek yogurt instead for healthy version)
-1/2 cup brown sugar
-1 egg
-3 T. milk
-3-4 large bananas
-1 T. vanilla
-1 T. cinnamon
-1/4 cup nuts if your husband doesn't hate them

In a large mixing bowl, sift together flour, baking soda, baking powder, cinnamon, and salt. In a separate bowl, cream sugar and Greek yogurt (or butter). Beat the egg slightly and mix into wet ingredients. Peel the bananas, add to wet ingredients, and mash until creamy (I use a potato masher). Add vanilla and milk, then LIGHTLY combine wet and dry ingredients. Mix in nuts (optional).

Spread batter in a large loaf pan or a muffin tin coated with cooking spray.
Bread: Bake at 350* for 40-50 minutes
Muffins: Bake at 350* for 18-22 minutes, until tops are browned.

Enjoy warm!


Monday, January 14, 2013

etsy shop announcement!


I am SUPER EXCITED to announce the grand opening of my new Etsy shop, Annika Likes !!! 
Check it out and let me know what you think!
So far I'm selling knit scarves and original watercolor stationery. I'll be adding more and more inventory-- next up is Valentine's cards. 

I'm looking forward to seeing where this little entrepreneurial adventure leads!

Tuesday, January 8, 2013

2013 week one

Chicago lights

I can't believe we're already part way through the second week of the year! I spent the first week trying to recover from the nasty cold/flu bug everyone is getting (luckily Ben escaped it, probably due to his just-in-time flu shot...) while also teaching a winter science camp for grade schoolers at the Arboretum, babysitting, and running around downtown with my family who were visiting the city on a mini-vacay.

And I straightened my hair just for fun to go to a friend's goodbye party at a super swanky high rise apartment with two private elevators. 
It's always interesting to see how long the hair is getting, since curls bounce it up about 2-4 inches. And it's also interesting to see how the "other half" lives...


And I have been working hard on my newest endeavor. I caught the knitting bug last November and I've decided to open an Etsy shop to sustain my hobby. I'll be selling cozy chunky scarves (some including sparkles of course) and also watercolor stationery since I had so much success with my DIY wedding invitations.
I'm hoping to open the shop by the end of this week ahhhh!! It takes so much work to open! I'm super excited.

I hope your year is off to a productive and happy start! 

(And I hope you've managed to avoid this plague flu thing, ugh.)


Tuesday, January 1, 2013

holidays 2012

Well. 2012 definitely went out with a bang.
Ben and I spent a long action packed week road-tripping around the Midwest to celebrate Christmas with both of our families. (One of the unexpected perks of being married is getting a double holiday!) I'm very glad that we got to spend time making fun memories with so many people we love, and I'm not taking for granted that our grandmas are still healthy and "with it". We were only missing my sister Ella who is teaching English in Slovakia (hi Eelie!).

 Well, all the revelry finally caught up to me and on Sunday I got hit by the cold virus that's apparently making rounds like the plague. I'm looking forward to getting back into a healthy normal routine again!

From Indiana to central Illinois to Michigan and back to Chicago, here's a few shots of the laughing, eating, drinking, animal snuggling, and celebrating that happened.


2012 was a huge year full of extremes. Moving three times, getting married, multiple jobs, and making it through a quarter life crisis (yes, they definitely exist) will take it out of you, and I'm happy to be able to look back on the memories from the other side.

I have absolutely no idea what 2013 has in store. For the first time in...possibly ever?... there are no graduations, weddings, moves, or other big events pre-scheduled on the calendar. I'm wishing for a calmer, happy and healthy year for myself and everyone. Cheers to a fresh start!

Happy New Year!


Related Posts Plugin for WordPress, Blogger...